New drywall collects lots of dirt particles from dust, hairspray and cosmetics. That’s why you need a good primer before you paint the walls and ceiling.
Choose a water-based PVA primer like Kilz 2 that seals pores and blends mud in with raw paper surfaces. It also has low VOCs and dries quickly. Contact Painting New Drywall now!
After sanding, cleaning, and taping, painting new drywall requires a primer to help the top coats of paint bond with and adhere to the smooth, porous surface. Primers also hide seams, screw holes, tape, and corner bead to create a clean surface.
Whether you’re painting a ceiling or wall, there are several options when it comes to buying a drywall primer. Whether you choose a water-based or oil-based product, it’s important to follow the product guidelines for proper application. If you are concerned about the fumes of an oil-based primer, you can opt for a low-VOC primer sealer like the Rust-Oleum Zinsser Cover Stain Interior/Exterior Primer Sealer. This primer will prevent stains and can be used on most surfaces, including glossy ones.
While you may be tempted to skip the priming step, doing so will make it difficult to achieve an even and attractive finish. This is due to the fact that bare drywall absorbs paint at different rates, and the top coats of paint will not cover well without a primer to level the differences.
Drywall primers contain polyvinyl acetate (PVA), which makes them an ideal choice for sealing drywall because they have excellent adhesion properties. In addition to ensuring that your paint will adhere, a good quality primer will help you avoid high spots on the walls and ceilings. These spots are created when a sanding dust particles settle on the surface and become more noticeable once the primer has dried.
The best drywall primers are formulated to be easy to sand and work with latex paints. They also hide stains, and can protect against mildew and mold growth. Many drywall primers are designed to be used in damp environments, so they are best suited for rooms such as bathrooms or basements that can be subject to moisture and humidity.
For a water-based drywall primer, try the Zinsser Bulls Eye 1-2-3 (AKA Smart Prime). This primer can be used on a variety of surfaces and is great for preparing drywall for paint. It is durable, dries quickly, and can hide stains such as pet odors, smoke, or wood tannins. This drywall primer can be purchased at most hardware stores or online.
Sanding
Whether you’re finishing a small room or an entire house, sanding drywall is often the most time-consuming part of the process. And although it may be tempting to skip this step, it’s critical for a smooth and beautiful paint job. Drywall sanding removes paper fuzz, smoothes tool and lap marks, flattens crowned areas, feathers compound edges to blend into unfinished or untaped surfaces, and helps the taped seams set and hold.
To get the best results, use a hand sander with 150-grit sandpaper or sanding screen to go over all surfaces, seams, corners and fasteners. Be careful not to oversand, as you could expose and scuff the underlying gypsum core. If sanding exposes a patch of bare gypsum or you can see or feel the drywall tape, apply more mud, feather it out and sand again.
While sanding, inspect the wall or ceiling for rough spots, pits, dings, gouges or scratches. A flashlight or work light will help you find these trouble areas so that you can touch them up with joint compound before priming and painting. A carpenter’s pencil is also helpful for marking these problem areas to make them easier to find later.
Drywall sanding generates a lot of dust, so cover the area with plastic drop cloths and wear a respirator mask to protect yourself. In addition, it’s wise to invest in a portable dust extractor to minimize the amount of drywall dust that escapes into the rest of the home.
Wet sanding can reduce the amount of dust, but it doesn’t produce as smooth a finish as dry sanding. If you’re working with a limited timeline or the finished product won’t require a super-smooth surface, consider wet sanding.
When wet sanding, be careful not to over-saturate the sponge with water, as this can cause a sticky mess that will create an uneven surface. When using a handheld sander in corners, be sure to use an angled wet/dry sanding sponge, as it’s difficult to get crisp corner work with a hand sander. Also, be careful not to sand too heavily in inside corners, as you could cut into the drywall or make a channel that will need touch-up with mud.
Sealing
Drywall is not immune to imperfections, so you’ll need to smooth and sand any areas of your wall that don’t look just right. This step is important because it will help your finish paint adhere to the drywall and protect the surface for years to come. It’s also a good time to fill any cracks or holes with joint compound, and sand again once that dries. This will create a solid base for your next coat of paint, and allow you to hide any small knicks or dings.
When you’re ready to start painting, be sure to use a high-quality latex primer that is designed for your type of paint. Don’t skip this step, as using a non-primer could lead to your paint not adhering to the drywall. Also, a high-quality primer will help the finished paint job look shinier and more uniform.
If you want to save a little money on the cost of primer, there are all-in-one paints available that have built-in primer. However, keep in mind that this will require you to buy twice as much paint, because your walls will suck up the color on top of the primer.
For the actual painting, it’s best to work in a well-lit room so you can see the work you’re doing clearly. Especially when you’re working with new drywall, the surfaces are extra dusty and you’ll need to be careful not to make any mistakes that can affect how your final product looks. A good lint-free roller will ensure your paint doesn’t drip or leave streaks. Avoid polyester roller covers, which can spatter and leave lint behind; instead, opt for lambswool or mohair covers.
After you’ve finished rolling on a few coats of paint, it’s a good idea to let your drywall settle for about 24 hours. Then, you can touch the surface and feel how it’s holding up to your touch. At this point, it’s safe to start moving furniture back into place, remove the drop cloths, and begin enjoying your newly painted drywall. And don’t forget to wear your mask when working with drywall, as the fine dust can cause serious respiratory problems if inhaled.
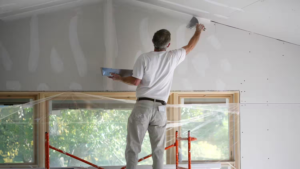
Painting
Painting new drywall is a big job and should only be done by professionals. If you decide to take on the project yourself, it will be more fun if you’re prepared. Start by removing any furniture or decor that could be at risk of getting paint on it. Use painter’s tape to protect trim, casing and baseboards, and put down a drop cloth on the floor to keep paint drops from staining carpet or wood floors.
Next, inspect the drywall for any gouges or dents, and use a drywall mud to fill them. Then sand the walls and ceiling to smooth them out, and vacuum or wipe the surfaces clean to remove sanding dust.
Then you can apply a coat of primer to the walls or ceilings. This is a necessary step that people sometimes skip to save time, but it helps ensure that the paint will adhere to the surface and help hide any stains from drywall mud or tape. New drywall is extra porous, so the primer will help to absorb more paint and make the walls ready for the final coat.
After the primer is dry, sand the surface once again to smooth it out and remove any tool marks. Then vacuum or wipe the surfaces clean to remove a last bit of sanding dust and prepare the surface for painting.
If you are spraying the wall or ceiling, choose an acrylic latex spray paint that is formulated for drywall and be sure to follow the manufacturer’s instructions for application. If you’re rolling, opt for a lint-free roller with a 1/4-inch or 3/8-inch nap for flat or semigloss finishes on smooth drywall and a thicker 1 inch nap for textured drywall. Always back roll when applying paint to avoid streaks and drips.
When you’re ready to paint, it’s important to plan ahead and buy enough paint to cover the entire room. Especially on new drywall, two full coats of paint are required to get great coverage and a solid finish. It’s also best to use a high-quality drywall paint, as it will be more durable and provide better coverage than regular house paint.